Instructions

Please click on the product name below to reveal the instructions for your Armourcard product.

The ultimate RFID Blocking card the new generation ArmourcardACTIVECongratulations on now owning the latest generation Armourcard with our patented technology including the latest RFID jamming / blocking technology on the market.

Activating your card:

Your ArmourcardACTIVE card has been shipped ready to go. So you do not have to activate it.

Register your card:

We ask you to please register your product with us for warranty purposes. You can register your product here 

Power / Batteries:

The new generation ArmourcardACTIVE card does not have an internal battery like the previous generations, with the advancement in technologies we have been able to do away with the battery. The ArmourcardACTIVE card uses the electro-magnetic field produced by the interrogating RFID / NFC skimmer or reader. Once your ArmourcardACTIVE detects the field the active jamming instantly powers up and prevents your RFID/NFC enabled bank cards from being read.

Placement of your card:

Then place the ArmourcardACTIVE card in your wallet or purse, for the best results be sure to position your ‘Tap & Go’ credit cards in front or behind the ArmourcardACTIVE card that way the jamming proximity will cover your RFID enabled tap & go cards.
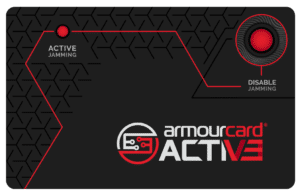
Red Button:

The red button on the top right of the ArmourcardACTIVE card works in a similar way to the previous generations, when you press and hold the button it will temporarily disable the jamming feature, which will allow the authorised transaction by you to proceed. Once you release the button the jamming feature will be active again.

Testing your card:

The simple way to test your ArmourcardACTIVE is next time you are at the check-out at a store and you are about to use the tap & go terminal to pay, just place the ArmourcardACTIVE card near the payment reader.

You will start to see the red LED light come on indicating the jamming feature is activated as it has detected the RFID interrogating field. If your payment card is with the payment card you will notice that payment will not go through until you depress the red button on the ArmourcardACTIVE or remove the ArmourcardACTIVE away from the payment card.

For more information go here

Please give us a Positive Review

Reviews mean so much to businesses if you could spare a moment and write us a positive review on GOOGLE

Or write us a testimonial on our website here

We would really appreciate it. Thanks again and stay safe.

Congratulations on owning the PassportBLOCK, we developed this product with security and convenience in mind.

Register your product:

We ask you to please register your product with us for warranty purposes. You can register your product he

How it works:

The PassportBLOCK is super convenient and fits into your ePassport’s RFID chip page like a bookmark. It then blocks out any RFID reader / skimmer trying to read your ePassport details.

Placement:

Locate the page inside your passport that holds the RFID chip, it has the RFID symbol on it and it is thicker than other pages. It also has ‘DO NOT STAMP THIS PAGE‘ printed on it. Then simply place your PassportBLOCK on that page like a bookmark. You can secure the PassportBLOCK with the elastic strap so the PassportBLOCK does not fall out.

Be sure to remove* the PassportBLOCK, from the passport when giving your passport to customs and border security in case they require to scan the RFID chip contained inside. (* if you don’t remove it, customs may not be able to scan your ePassport RFID chip)

Please give us a Positive Review

Reviews mean so much to businesses, if you could spare a moment and write us a positive review on GOOGLE

Or write us a testimonial on our website here

We would really appreciate it. Thanks again and stay safe.

How does Armourcard DataBLOCK work

How does Armourcard DataBLOCK work

Congratulations on purchasing the DataBLOCK 3in1 this product will protect your devices when charging on public charge stations.

Register your product:

We ask you to please register your product with us for warranty purposes. You can register your product here

Our multi-pin device will help protect you and your devices against data theft and malware injections when using public charge stations or untrusted USB ports. This helps prevent ‘Juice Jacking‘ from your devices while charging.

The DataBLOCK 3in1 is the perfect additive to your keyring, it has 3 different port types ( Micro USB, IOS & Type-C devices) which means you can now safely charge all your devices without the risk of becoming a victim of juice jacking.

How to work it

Simply choose the pin that your device uses to charge, then plug that pin into your device, then on the other side of the 3in1 plug in the cable that connects to the charging port or USB port. Your device will now be protected and start fast charging like normal. Remove from your device as normal when you have finished charging.

Please give us a Positive Review

Reviews mean so much to businesses, if you could spare a moment and write us a positive review on GOOGLE

Or write us a testimonial on our website here

We would really appreciate it. Thanks again and stay safe.

Congratulations on purchasing your personal alarm system – ArmourALARM

ArmourALARM personal security alarm by ArmourcardRegister your card:

We ask you to please register your product with us for warranty purposes. You can register your product he

Multiple ways to activate the alarm feature

How to use:

ArmourALARM – operating instructions

Multiple ways to activate the alarm feature

How to use:

  1. Firstly, ensure the Alarm is fully charged, when fully charged the LED will turn blue (from red) on the alarm unit
  2. To activate the unit, pull the keyring upwards, press the large button on the unit and the button on the side, the LED will come on and the alarm will sound, press the key chain back into the unit to stop the siren and LED.
  3. Press the left switch button for 2 seconds, the alarm starts to ring loudly
  4. Pull out the key chain pin to also activate the alarm loudly with bright flashing LED, simply push the key chain pin back in to stop the alarm and flashing LED.
  5. Press the large SOS button for 2 seconds to also activate the alarm siren and flashing LED light, press the SOS button, and hold for 2 seconds to disable the alarm and LED.
  6. Give 2 quick presses of the large SOS button to activate the LED light as a torch/flashlight. To turn off give two quick presses of the SOS button and the LED will turn off.
  7. You can also press the large button, small button and ring pull in various ways to get different siren sounds and volumes.


Please give us a Positive Review

Reviews mean so much to businesses, if you could spare a moment and write us a positive review on GOOGLE

Or write us a testimonial on our website here

We would really appreciate it. Thanks again and stay safe.

ArmourcardBLOCK RFID protective cardCongratulations on purchasing the ArmourcardBLOCK card

Activating your card:

Your ArmourcardBLOCK card has been shipped ready to go. So you do not have to activate it.

Register your card:

We ask you to please register your product with us for warranty purposes. You can register your product here 

Placement of your card:

Then place the ArmourcardBLOCK card in your wallet or purse, for the best results be sure to position your ‘Tap & Go’ credit cards in front or behind the ArmourcardBLOCK card that way the jamming proximity will cover your RFID enabled tap & go cards.

Please give us a Positive Review

Reviews mean so much to businesses, if you could spare a moment and write us a positive review on GOOGLE

Or write us a testimonial on our website here

We would really appreciate it. Thanks again and stay safe.

Congratulations on purchasing the USB DataBLOCK, this product will save your devices when you charge-up on public charging ports or unknown / insecure USB ports.

Register your product:

We ask you to please register your product with us for warranty purposes. You can register your product here 

How to use:

The USB DataBLOCK is very easy to use, just plug the DataBLOCK into the public USB port (like you find in shopping malls) then simply plug your device’s charging cable into the DataBLOCK USB end and connect the cable to your device. 

How it works:

With your device plugged into the USB DataBLOCK it will start fast charging as normal but will not allow any data transfer or malware to be put onto your device by what is called ‘Juice Jacking

Please give us a Positive Review

Reviews mean so much to businesses, if you could spare a moment and write us a positive review on GOOGLE

Or write us a testimonial on our website here

We would really appreciate it. Thanks again and stay safe.